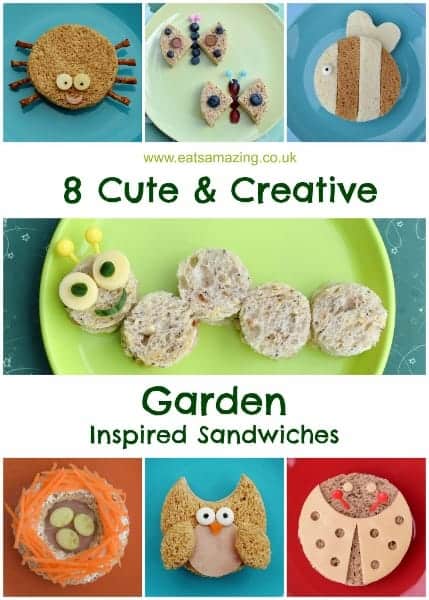
It's been a while since I've done one of my creative sandwich posts, but today I've got another fun kids sandwich series for you - a whole 8 garden themed sandwich ideas to be precise! As summer has arrived and we're spending a lot of time in the garden, I thought that garden themed food ideas would be ideal for this season. You may recognise a few of these sandwich ideas from past lunches, but I'm sharing some fresh new ideas here too, and I had a lot of fun creating them!
All of these sandwiches were made using circle cutters, as I think that a circle is the most likely cutter shape that your average person would already have available in their kitchen (if not, I do have some nesting circle cutter sets currently available in the Eats Amazing Shop!). For all of these sandwiches, I tried to come up with designs that are easy to put together, so they would be great to use for a quick fun healthy snack as well as for fun lunches and picnics this summer.
Here are a few tips for you before I begin:
1. As mentioned above, I used various sizes of cutter from a nesting circle cutter set to make all of these sandwiches. Many of them could easily be resized to make mini versions for cute party food – just use a smaller circle cutter. If you don’t have circle cutters, you could try using different sized glasses, mugs, bowls or plates by cutting around them with a small sharp knife. For some of the sandwiches I also used tiny cutters from my mini bento cutter sets.
2. A good tip when making shaped sandwiches is to cut each piece of bread out separately and fill them after – this way you will get much neater edges.
3. If using ham or other sandwich meats, cut the meat into shape (in this case a circle), before adding to the shaped bread. The same applies to slices of cheese – if using a hard cheese such as cheddar then cut into slices, lay them out together to make one large slice and cut into shape before transferring to the bread.
4. If your sandwich is going in a lunch box rather than being served up immediately, you can ‘glue’ any features or decorations in place using foods such as cream cheese, houmous, mayonnaise, nut butter, chocolate spread, honey or jam, depending on your sandwich filling.
5. For some sandwiches I used my homemade edible icing eyes, but if you don’t have any you can also cut some from cheese using a mini circle cutter (you could also use the end of a plastic drinks straw) and an edible marker pen or food colouring to dot them. You can also buy ready made icing eyes from Amazon UK.
6. You’ll most likely generate lots of spare crusts of bread after making circle-shaped sandwiches, but don’t waste them! See my post on making waste-free fun bento lunches for some great ideas to use them up.
The first of my garden sandwich ideas is this simple ladybug sandwich. This is so easy to make, with minimal equipment needed. I used this sandwich in a cute ladybug bento lunch recently, do pop over to the blog post to see lots of other fun ladybug themed food ideas too!
To make the ladybug, start by making a round sandwich (I used the largest of my nesting circle cutters). Take a piece of cheese (I used a slice of Leerdammer), and cut it into a circle using the same cutter as for the sandwich. Using a smaller circle cutter, remove a semi-circle for the head. Using a sharp knife, cut a triangle down the middle and remove. Using a tiny circle cutter or the end of a drinks straw, cut holes for the spots and remove. Lay the cheese over the top of the sandwich. If the sandwich is going in a lunch box, you might want to stick the cheese down with a few dabs of cream cheese, houmous or mayo. Take a couple of the mini circles of cheese from the dots and place on the sandwich as eyes. Finish off with polka dot bento pick antennae if wanted.
Next up is this cute bee - I was so pleased with how it turned out! I used this sandwich in a cute valentines bento lunch earlier this year with the tag-line 'bee mine'!
To make it, start by cutting out three large circles from bread using a circle cutter. One of the circles needs to be cut from a different colour/type of bread. Place two circles of contrasting colours together, and cut into 4 equal slices.
Using a heart shaped cookie cutter, cut a heart shape from a tortilla wrap for the wings (if you don’t have tortilla wrap, you could also use another type of bread such as naan, pitta or even plain white bread). Cover the other circle of bread with your sandwich filling – it needs to be something fairly sticky in order to hold the sandwich together. I cut a circle of ham using the same cutter I’d used for the bread and spread over some houmous. Pop the heart shape onto the sandwich to form the wings and spread a little more of the sandwich filling over the bottom half of the heart. Take alternate coloured slices of bread from the circle you cut earlier and layer on top to form the sandwich.
Finish by adding an edible icing eye, eye bento pick or small circle cut from cheese to give your bee an eye. You’ll have some stripy slices of bread left, so you could make a second bee sandwich for yourself! You could also make multiple smaller versions (they’d be really cute for a children’s party!) using a smaller circle cutter.
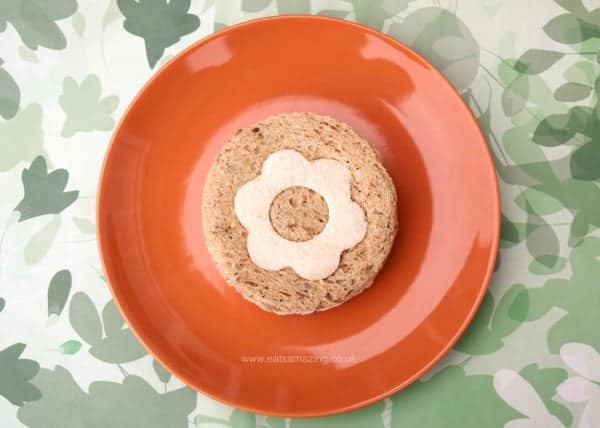
Next on the list is this simple but pretty flower sandwich. Like the bee sandwich, this one uses two kinds of bread in contrasting colours. To make it, use your largest circle cutter to cut a round from one white and one brown piece of bread. Take a flower shaped cookie cutter, and cut a flower from the middle of each round. Take a small circle cutter, and cut a circle from the centre of each flower. Replace the flowers in the bread, swapping the colours over to get the contrasting effect. Fill and sandwich the two rounds together. I find a more solid filling such as ham or roast beef works best for this sandwich as it helps hold it all together - before putting it in the sandwich cut it to shape with the same circle cutter you used for the bread. If making more than one of these sandwiches, you could use plain rounds for the bottom piece of bread in each sandwich to save cutting out extra flowers.
I've been doing a bit of gardening recently and everywhere I go I seem to run into spiders, so this spider sandwich seemed appropriate for the garden collection! This is a very simple sandwich to make. Cut out two circles with the largest size cutter that will fit your bread, fill and put together in a sandwich, add twiglet legs by poking them into the sandwich filling, and add eyes cut from cheese with a mini circle cutter to the top. I dotted the eyes with an edible marker pen, and added a little ham mouth, which I cut out using the same small circle cutter that I’d used for the eyes. Other foods you could use for the legs include vegetable sticks such as carrot, pepper or cucumber, mini bread sticks or ‘stick shaped’ crisps such as Organix carrot stix for example.
I made this cute caterpillar sandwich for Small Baby recently, and he absolutely loved it! One of his favoruite books at the moment is the very hungry caterpillar so anything involving these little creatures is sure to be a hit with him!
To make, use a small circle cutter to cut out five or six mini round sandwiches. Arrange on a plate to form the caterpillar. Using a round mini bento cutter, cut out two eyes from cheese, then add tiny circles of cucumber skin to complete them. Cut a mouth from cucumber skin (I used the circle cutter but you could also do it freehand) and add to the caterpillar along with the eyes. Finish off with a couple of polka dot bento picks if you have them.
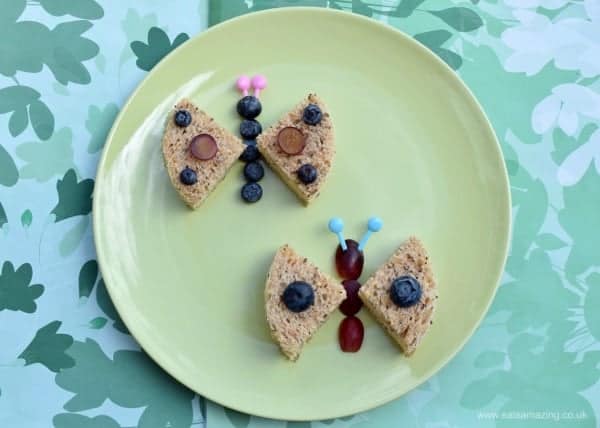
These simple butterfly sandwiches are quick to make and fun to decorate - why not challenge older children to decorate their own? To make, cut a sandwich into a large circle using your biggest circle cutter. Cut the circle into quarters, and arrange on the plate to make two sets of butterfly wings. Decorate with slices of grape and bluberries, or other fruit or vegetables of your choice. Add polka-dot bento picks to finish them off if you have them.
The next sandwich is a sweet springtime nest that Imade earlier this year. This is definitely a sandwich to be eaten at home as it is similar to an open style sandwich so I'm not sure it would travel particularly well! To make this sandwich, use crinkle sided circle cutters if you have them. First cut two large circles from bread and one from ham. Then cut a smaller circle from the middle of one of the bread pieces, and assemble the sandwich as shown below. To turn it into a nest, first spread the top of the ‘nest’ with cream cheese, then top with small pieces of carrot, cut into slivers using a julienne peeler if you have one.
Finish the nest off with some little eggs cut from cucumber slices using a mini bento cutter.
Last but not least one of my favourite sandwiches - this cute owl was originally made for Halloween but it can be used for any time of the year. I used this sandwich in a fun Harry Potter Bento a few months back, and as we have a resident owl that regularly sits in a tree just outside our bedroom window, I think it's perfect for the garden theme too!
Brown bread works particularly well for this, but you could use any bread of your choice. To make, first cut two circles from your bread using your largest circle cutter.
Using a smaller circle cutter, cut a piece from the top of one of the bread circles. Repeat with the second circle of bread, placing the first piece on top as a guide. Put the two pieces together and fill to make your sandwich. Using your smallest circle cutter, cut out a piece of ham for the owl’s tummy. Assemble, using the two extra pieces of bread as wings (you may need to trim these down slightly using the smallest circle cutter. Finish with edible eyes and cut a piece of carrot into a triangle for the beak.
That's the end of the garden sandwiches, for now at least! Can you suggest any other fun themes for me to work on for my next set of creative sandwiches?
Grace
Disclosure: This post contains some Amazon affiliate links; I may receive commission on items purchased through the links.


flourishing little mind says
I love these!! the bee sandwich is deffo on our list of lunches to have soon! so cute!
Grace says
Thank you! The bee is one of my favourites too!
Louise Fairweather says
Little man loves having sandwiches like this - I really should make them more often for him x
Grace says
It's fun to do every now and again - mine always enjoy them 🙂
Joan Schofield says
How do I cut out designs with smooth and level edges, and not crushed? Thank you.
Grace says
Hi Joan, a good tip when making shaped sandwiches is to cut each piece of bread out separately and fill them after – this way you will get much neater edges. There are a few more tips at the top of this post that might help too 🙂