

As promised in my last post, today I will share with you two different methods for making home-made edible eyes. Icing eyes have long been on my to-try list, as the ready-made kind just don't seem to be available in the shops here in the UK, but until now I had been put off by my complete lack of icing skills. I love the idea of decorating cakes, and when the opportunity presents itself, I always charge in enthusiastically and give it my best shot (the minion cakes I made for Small Child's birthday this year were my best effort yet!), but I have to sadly admit that I am no wizard with a piping bag, much as I'd love to be! The thought of piping out hundreds of tiny dots pretty much made me break out into a cold sweat, as my record on that kind of thing just isn't good (ask Mr Amazing about my spider-splats, he'll no doubt be delighted to tell the tale!), but I really, really wanted some icing eyes! Just recently though, I had a fortunate and timely brainwave, just in time for Halloween!
I spotted little sauce bottles made by Sistema in my local supermarket, and I couldn't resist them. Of course they would be perfect for carrying a little portion of ketchup or mayo in a lunch box, and no doubt I will use them as intended at some point, but I had another use in mind for them. It struck me that they would be perfect for icing little details, and possibly easier to use than a piping bag, at least for me! I bought them, all ready to trial my idea last week, and was pleased to bits to find that it worked, better than I thought possible!

I couldn't find the ready-made royal icing sugar, so I used normal icing sugar and this simple recipe that I found on the fantastic Red Ted Art website. I cut the icing recipe down by half, but I still had far too much icing for my needs, so would recommend cutting it in half again for this project.
Start by lining a couple of baking trays with greaseproof paper. To keep mine from moving around during such a delicate task, I secured the paper to the trays with a bit of sellotape.
Make up your royal icing, following the recipe I've linked above, but using only a quarter of the amounts. Start with the icing at a piping consistency, then slowly add water, little by little, until it is somewhere between piping and flooding consistency. As a rough guide, if you lift out a spoonful of icing and drop it back into the bowl, the icing should take about 5 seconds or so to be absorbed back in. It may take a little trial and error to find the perfect consistency, but you can adjust either way by adding a little more water or a little more icing sugar until it is right.
Using a teaspoon, fill your squeezy bottle with icing. Squeezing gently, carefully drop the icing in rows onto the prepared baking trays, taking care to leave a gap between each drop so that they don't run together. I had a few run into each other, so after that increased the distance between them slightly. This may take a bit of trial and error, but don't worry too much about getting them all a uniform size, I deliberately tried various sizes out, even making a few jumbo ones when I got bored! I thought it would be great to have a range of sizes, it adds to the charm! Refill the bottle with icing when necessary.
Once you have piped out as many eyes as you'd like, or your hand aches too much to hold the bottle any more, put the trays somewhere safe to dry. I left mine overnight, and they were dried out nicely ready for the next step the next morning.
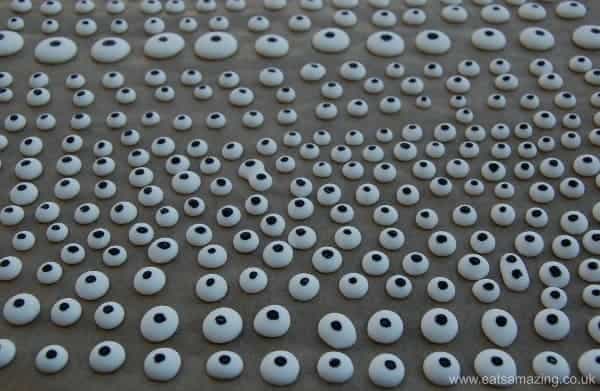
To finish the eyes off, take a cotton bud and some black food colouring (I used a gel for a stronger colour), and gently dab the top of each eye with the colour to add a pupil. Again, this may take a bit of trial and error, but if you're anything like me you'll probably have lots of eyes to practice on! I found the fantastic cotton bud tip in this post from Reading Confetti, and I have to say, it saved me so much time! After piping all those eyes, I don't think I could have done it all over again with black icing, and I'm not sure I would be able to create fine enough dots either, but the cotton bud trick worked perfectly! In a matter of minutes I was able to dot hundreds of eyes with minimum effort.

Pop your newly dotted eyes back in a safe place to finish drying out. I left mine overnight again, to be certain they were dry. Once dry, store in an airtight container and keep in a cool dry place.
This project was far easier than I thought possible. Never one to do things by halves, I filled three trays with the eyes, and now I have literally hundreds of edible icing eyes, which should keep me going for a while! Do watch out for their appearance in some of my Halloween projects this month!
Now I did promise two different kinds of edible eyes, and if the project above seems a bit to much effort for you right now, I have the perfect solution for you. These eyes take literally seconds to make, use only two ingredients, and they are even self-adhesive!

All you need for these instant edible eyes are some mini marshmallows, a pair of clean kitchen scissors and a black edible marker pen. If you haven't got an edible pen, a dot of black food colouring with a fine paintbrush should also work.
To make, take a mini marshmallow, cut in half, and dot each half with your edible marker pen. That's it, instant edible eyes!

I initially dotted the eyes on the cut side, because I liked how they looked that way but then I realised that the cut side of the marshmallow was sticky, and therefore could be stuck to things with no other 'glue' needed, so then I dotted them on the other side instead. These sticky eyes can be attached to pretty much any food, but I particularly love how they look on fruit!

You can make them as and when needed, but if you decided to make a batch of them you can store them in an airtight box. If they dry out simply dab them with a drop of water and they should stick to anything.
I also made a fun little video of these mini marshmallow eyes which you can watch here:
If you have any trouble seeing the video above, click here to watch it on YouTube, and don't forget to subscribe to the Eats Amazing YouTube channel while you're there!
I'm off to find a use for the hundreds of edible eyes I have knocking around in my kitchen now! What would you use them for?
Grace
Love these ideas? Don't forget to pin this post so you can easily find it again!

Mum to a monster says
definitely will be trying this thank you
Grace says
Would love to see a photo if you do! 🙂
Donna says
These are so cute! Such a lovely, simple idea! x
Grace says
Thanks Donna, I'm really pleased with how they turned out! 🙂
lori kearney says
Thanks for the idea of the marshmallow eyes. My daughter is allergic to egg, so royal icing is out. We will try this next month for her birthday party.
Grace says
Oh I'm so glad to help, hope she has a fab party!
Stacey Kemeys says
YOU are a life saver!!! I was just wondering what I was going to do for eyes!!!
Mary Aris says
Can you use a plastic air-tight container to store them?
Grace says
Hi Mary, yes I stored mine in a plastic air-tight container and they last for ages!
Basma says
Love this recipe, do you know if i could use these in cookies? Ive seen some baking inspiration where they make chocolate chip cookies and they use candy eyes instead of chocolate chips and wanted to know if these would hold up in the oven?
Grace Hall says
Hi Basma,
These would almost certainly disintegrate in the oven but you could add them to the top of the baked cookies?