

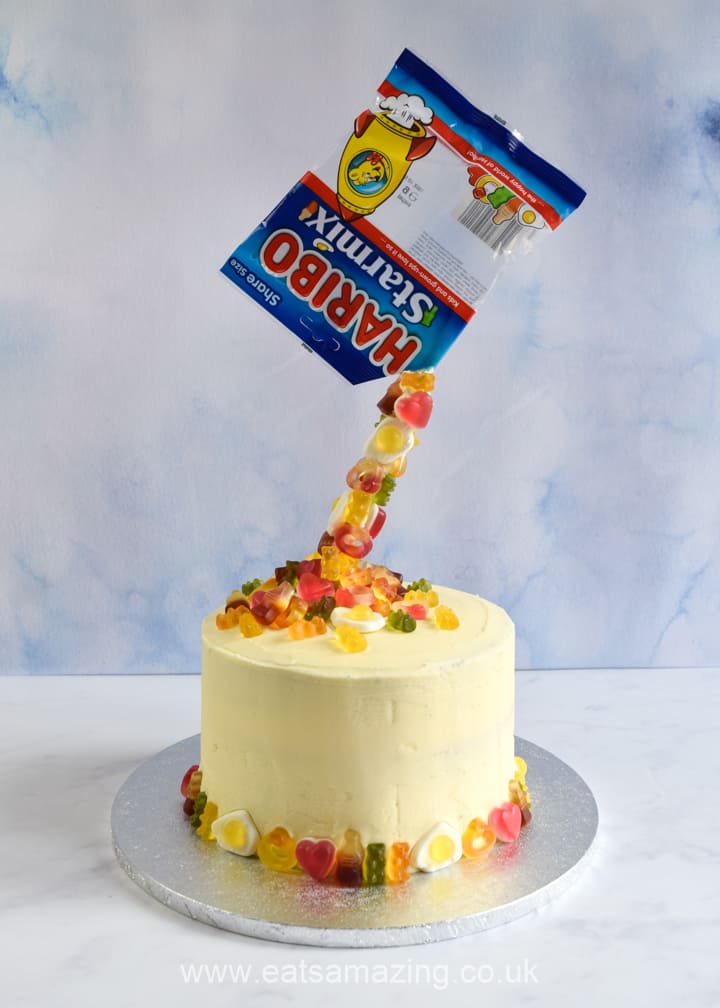
This fun anti-gravity cake topped with HARIBO Starmix sweets is easy to make and is sure to wow everyone who sees it!
Sponsored Post

25 years ago, HARIBO brought together its most well-loved assortment of sweets to create the brand’s first ever mixed bag – HARIBO Starmix! The Egg, Heart, Ring, Bear and Cola Bottle sweets quickly became iconic and eventually went on to be named ‘Britain’s Favourite Sweet’!

To celebrate 25 years of Starmix, HARIBO challenged me to create a fun Starmix themed birthday cake and this fun gravity defying cake is the result. #HappyBirthdayStarmix
I’ve always wanted to try making an anti-gravity cake, or pour cake as they are also known, but at first glance it seemed quite a challenge. I did my research and found anti-gravity cake kits available online, but they were expensive, and I didn’t want to buy yet another kitchen gadget that might only be used once or twice.
So I did a bit of brainstorming and came up with my own method to make it super easy with no special equipment needed – just a plastic straw coated in Starmix sweets popped over a bamboo skewer to help position it and make sure it stayed put. To my delight it worked perfectly – the bamboo skewer kept the straw firmly in place and the end result looked brilliant!

I am so pleased with how this anti-gravity cake turned out – it’s a super fun cake that perfectly showcases all those yummy Starmix sweets! I’ve shared the full recipe below and you can also watch the full creative process from start to finish in my recipe video above (click here to watch it on YouTube if it doesn’t load for you).
Easy HARIBO Starmix Anti-Gravity Cake
Ingredients:
For the cake:
- 300g butter – softened
- 300g caster sugar
- 6 eggs
- 300g self-raising flour
- 1 ½ tsp baking powder
- 3 Tbsp milk
- 2 tsp vanilla extract
- blue and red gel food colourings (optional)
For the buttercream:
- 375g butter
- 750g icing sugar
- 1 Tbsp vanilla extract
To decorate:
- 50g white chocolate
- 2 large bags HARIBO Starmix
Preheat oven to 190°C (Gas mark 5/375°F). Grease and line the base of 3 x 20cm round cake tins.
Place the butter and caster sugar in a large bowl and whisk together until well combined and fluffy.
Add the six eggs, two at a time, whisking after you add each pair. Once the eggs have all been whisked in, add the flour, baking powder, milk and vanilla. Whisk again until fully combined.
Divide the cake mixture into 3 and split between 2 bowls – ⅔ in one and ⅓ in another. Using the gel food colourings, colour the larger portion blue and the smaller portion red. Divide the coloured cake mixture between the prepared tins, 2 blue, one red.
Gently smooth the tops down with a spatula, then bake in the pre-heated oven for around 20 minutes, until the cakes are springy to the touch. Turn the cakes out onto cooling racks and leave to cool before icing.
Whilst the cakes are cooling, prepare the buttercream icing. Whisk the butter until soft and fluffy. Add the icing sugar, a little at a time, whisking as you go until completely combined. Add the vanilla extract and whisk again until combined.
Remove 300g buttercream to fill the cake and a second 300g of buttercream for the crumb coating. Reserve the remaining buttercream for the final coat.
When ready to assemble, secure one of the blue cakes onto a board with a little buttercream. Spread over half of the buttercream you set aside for filling. Add the red cake and repeat the buttercream filling, then top with the final blue cake.
Using a palate knife, spread the buttercream that you set aside for the crumb coating all over the cake. Spinning the cake slowly, use a large cake scraper to even out the top and sides of the cake.
Once the cake is covered in the coating, pop the cake somewhere cool to allow the icing to set a little.
Carefully open one of the packs of HARIBO Starmix by cutting off one of the top corners. Remove the sweets, taking care not to damage the packet as this will be used as part of the cake.
Place the white chocolate in a small microwave safe bowl and gently heat until just melted – stirring as you go. Be careful not to burn it – white chocolate melts quickly!
Coat ⅔rds of a plastic straw with the white chocolate, then stick HARIBO Starmix sweets all over it.
Place the sweet-covered straw on a small plate and pop in the fridge until the chocolate has set.
Spread the remaining buttercream over the cake for the final layer. As before, spin the cake slowly and use a large cake scraper to even out the top and sides.
Push a long bamboo skewer into the top of the cake and then slot the Starmix covered straw over the top of it. The skewer should be pushed well into the cake so that it can securely hold the straw.
Take the HARIBO Starmix packet you prepared earlier, and place it over the top of the straw so that it looks as though the sweets are pouring out of the packet. You can stick the pack to the straw with a little of the melted white chocolate if it doesn’t sit easily in place.
Arrange some of the Starmix sweets in a pile around the base of the straw.
Use the remaining Starmix sweets to create a border around the base of the cake, pressing them gently into the buttercream to hold them in place.
Serve and enjoy!

Have you ever made an anti-gravity cake? I’d love to hear about it in the comments below!
If you enjoyed this recipe, you might also like these easy birthday cake ideas for kids:


Or for more yummy cake recipes, check out the Cakes and Cupcakes section here on the blog.
Grace
Disclosure: This recipe, video and blog post was commissioned by HARIBO. I was compensated for my time and the cost of ingredients, however all opinions expressed in this post are my own.
![]()

Easy Anti-Gravity Cake with HARIBO Starmix
Ingredients
For the cake:
- 300 g butter – softened
- 300 g caster sugar
- 6 eggs
- 300 g self-raising flour
- 1 ½ tsp baking powder
- 3 Tbsp milk
- 2 tsp vanilla extract
- blue and red gel food colourings optional
For the buttercream:
- 375 g butter
- 750 g icing sugar
- 1 Tbsp vanilla extract
To decorate:
- 50 g white chocolate
- 2 large bags HARIBO Starmix
Instructions
- Preheat oven to 190°C (Gas mark 5/375°F). Grease and line the base of 3 x 20cm round cake tins.
- Place the butter and caster sugar in a large bowl and whisk together until well combined and fluffy.
- Add the six eggs, two at a time, whisking after you add each pair. Once the eggs have all been whisked in, add the flour, baking powder, milk and vanilla. Whisk again until fully combined.
- Divide the cake mixture into 3 and split between 2 bowls – ⅔ in one and ⅓ in another. Using the gel food colourings, colour the larger portion blue and the smaller portion red. Divide the coloured cake mixture between the prepared tins, 2 blue, one red.
- Gently smooth the tops down with a spatula, then bake in the pre-heated oven for around 20 minutes, until the cakes are springy to the touch. Turn the cakes out onto cooling racks and leave to cool before icing.
- Whilst the cakes are cooling, prepare the buttercream icing. Whisk the butter until soft and fluffy. Add the icing sugar, a little at a time, whisking as you go until completely combined. Add the vanilla extract and whisk again until combined.
- Remove 300g buttercream to fill the cake and a second 300g of buttercream for the crumb coating. Reserve the remaining buttercream for the final coat.
- When ready to assemble, secure one of the blue cakes onto a board with a little buttercream. Spread over half of the buttercream you set aside for filling. Add the red cake and repeat the buttercream filling, then top with the final blue cake.
- Using a palate knife, spread the buttercream that you set aside for the crumb coating all over the cake. Spinning the cake slowly, use a large cake scraper to even out the top and sides of the cake.
- Once the cake is covered in the coating, pop the cake somewhere cool to allow the icing to set a little.
- Carefully open one of the packs of HARIBO Starmix by cutting off one of the top corners. Remove the sweets, taking care not to damage the packet as this will be used as part of the cake.
- Place the white chocolate in a small microwave safe bowl and gently heat until just melted – stirring as you go. Be careful not to burn it – white chocolate melts quickly!
- Coat ⅔rds of a plastic straw with the white chocolate, then stick HARIBO Starmix sweets all over it.
- Place the sweet-covered straw on a small plate and pop in the fridge until the chocolate has set.
- Spread the remaining buttercream over the cake for the final layer. As before, spin the cake slowly and use a large cake scraper to even out the top and sides.
- Push a long bamboo skewer into the top of the cake and then slot the Starmix covered straw over the top of it. The skewer should be pushed well into the cake so that it can securely hold the straw.
- Take the HARIBO Starmix packet you prepared earlier, and place it over the top of the straw so that it looks as though the sweets are pouring out of the packet. You can stick the pack to the straw with a little of the melted white chocolate if it doesn’t sit easily in place.
- Arrange some of the Starmix sweets in a pile around the base of the straw.
- Use the remaining Starmix sweets to create a border around the base of the cake, pressing them gently into the buttercream to hold them in place.
Video
Love this fun cake recipe? Why not save it to Pinterest so you can easily find it again!

Nic | Nic's Adventures & Bakes says
Thanks for sharing this looks amazing perfect for a birthday party 🙂
Kate King says
Hi there, if left overnight will the white chocolate melt & the sweets fall off? Thanks
Grace Hall says
Hi Kate, as long as you leave the cake somewhere cool the chocolate shouldn't melt at all so it should be find overnight. Hope that helps!